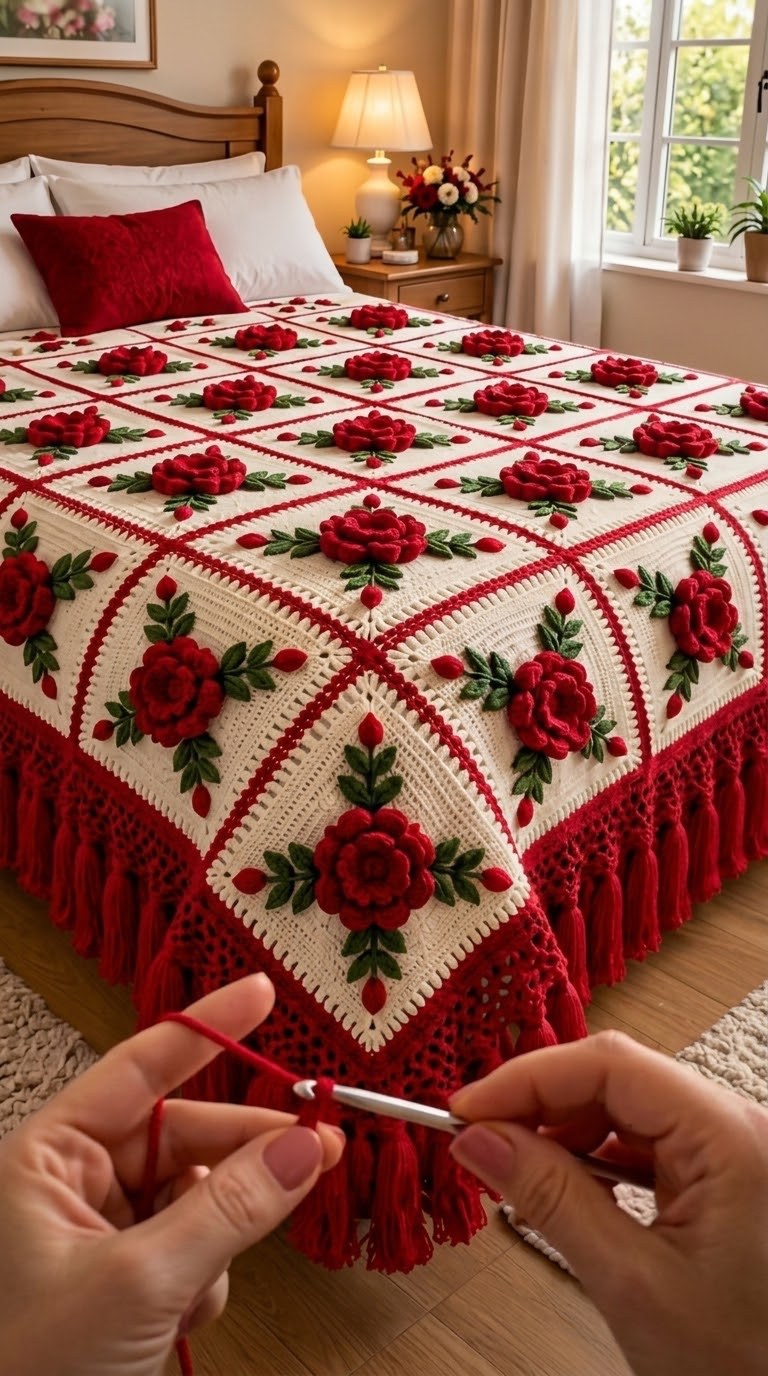
Some handmade pieces simply steal the show, and this crochet rose blanket is one of them. Crisp ivory granny squares, each crowned with a plump red 3D rose and fresh green leaves, are joined with bold red lines and finished with a deep fringed border. Draped over a bed, it turns an ordinary bedroom into a warm, romantic retreat that feels both timeless and festive.
Why You’ll Love This Blanket
- Stunning 3D roses: layered petals give each square real depth and texture.
- Classic red and ivory palette: perfect for Valentine’s Day, Christmas, or year-round romantic decor.
- Modular granny squares: work one square at a time, so it’s portable and easy to resize.
- Heirloom quality: a piece that can be passed down for generations.
Materials You’ll Need
- Worsted weight (medium #4) yarn in ivory/cream – main color for the squares
- Worsted weight yarn in deep red – roses, joining lines and fringe border
- Worsted weight yarn in leaf green – leaves
- 4.5 mm – 5 mm (G/7 – H/8) crochet hook
- Tapestry needle and sharp scissors
- Stitch markers
- A piece of cardboard (about 15 cm / 6 in) for making tassels
Tip: Choose a soft acrylic or a cotton-acrylic blend. It holds the shape of the roses well, is machine washable, and keeps the ivory bright.
How the Blanket Is Built
1. The Ivory Square Base
Each block starts as a classic solid granny square worked in the round. Begin with a magic ring, then work rounds of double crochet with (2 dc, ch 2, 2 dc) in every corner. Add a few rounds of textured stitches – such as front post double crochet or a puff-stitch round – to create the subtle ridged frame you see around each rose. Aim for squares about 25–30 cm (10–12 in) wide.
2. The 3D Crochet Rose
Chain a long foundation (around 40–50 chains) in red. Work a row of petals along it: (dc, ch 1, dc) in every other chain, then work 5–7 dc into each chain space to form scalloped petals. Roll the strip from one end into a spiral to form the rose, stitching through the base as you go to secure it. Sew the finished rose to the center of the square.
3. Leaves and Buds
For each leaf, chain 8 in green and work sc, hdc, dc, tr, dc, hdc, sc down one side of the chain, then repeat on the other side. Make 4–6 leaves per square and sew them in a cross or diagonal pattern around the rose. Small red bobble stitches or tiny rolled buds at the leaf tips add the finishing detail.
4. Joining the Squares
Lay out your squares in a grid (for example 6 × 7 for a queen bed). Join them with red yarn using a slip-stitch or flat zipper join on the right side. The raised red lines frame every square and create the beautiful lattice effect.
5. Lacy Border and Tassel Fringe
Work several rounds of red mesh or shell stitches around the whole blanket to create the deep lacy edge. Finally, wrap red yarn around your cardboard to make chunky tassels and attach one every few stitches along the bottom of the border for that luxurious, bedspread-style drape.
Tips for a Perfect Result
- Make a test square first and check the size before committing to the full blanket.
- Keep your tension consistent so all the squares match – block them before joining.
- Weave in ends as you finish each square to avoid a huge job at the end.
- Stuff the rose center lightly with a little yarn if you want it to stand out even more.
- Wash on a gentle, cold cycle and lay flat to dry to keep the roses in shape.
Make It Your Own
Swap the red roses for pink or burgundy for a vintage look, use white roses on a sage green base for a fresh spring version, or crochet just a few squares to make matching cushion covers and a table runner. The rose granny square is incredibly versatile once you have mastered it.
Final Thoughts
This rose granny square blanket is a true labour of love, but every square brings you closer to a breathtaking heirloom. Grab your hook, pick your favourite red, and start your first rose today. Don’t forget to share your progress with us in the comments!